
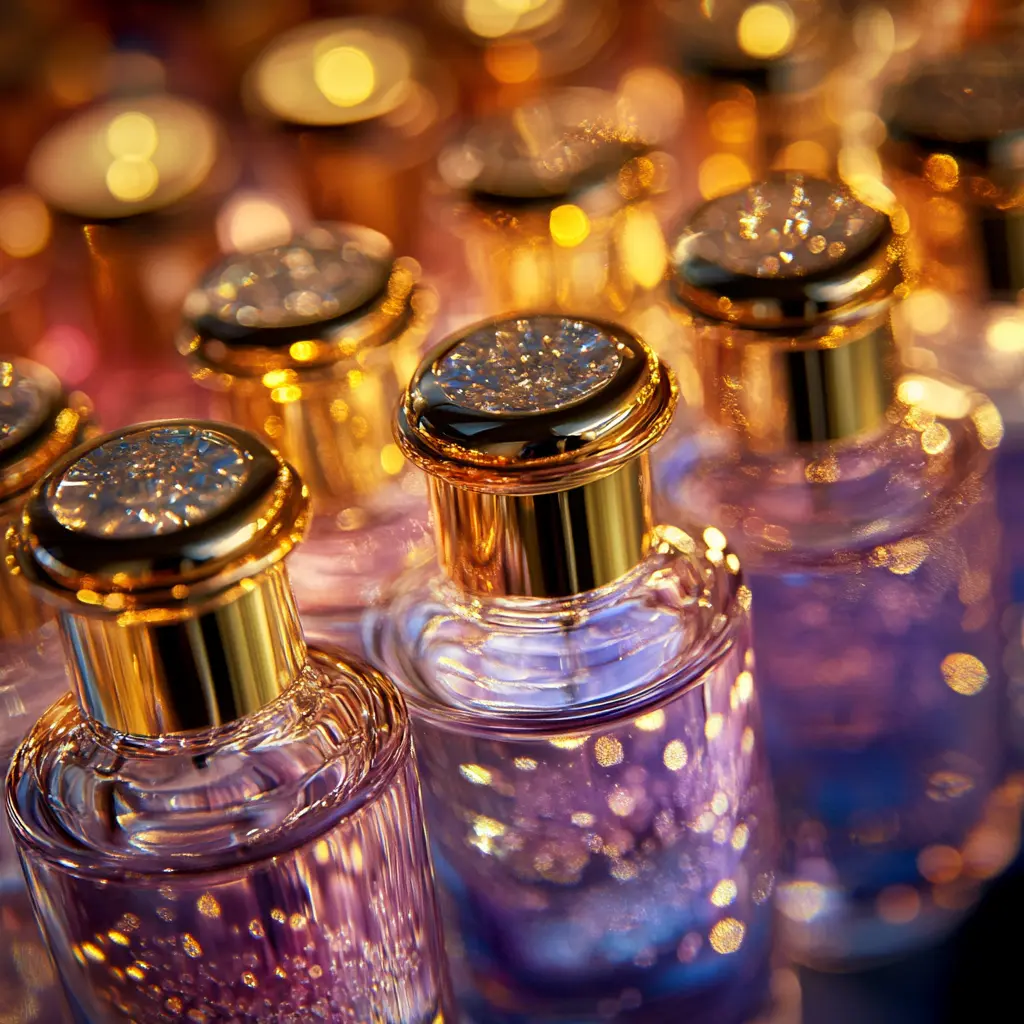
Perfume bottles are much more than mere containers for fragrance; they are miniature works of art. Their intricate designs, unique shapes, and exquisite details make them a fascinating subject for macro photography. Capturing these delicate bottles in macro mode allows photographers to showcase the craftsmanship and elegance that often goes unnoticed. Whether you’re a professional photographer or an enthusiast, understanding how to highlight the nuances of perfume bottles can transform a simple photograph into a stunning visual masterpiece.
Macro photography, with its ability to reveal minute details and textures, is the perfect technique for this task. By focusing on the intricate designs, reflective surfaces, and delicate features of perfume bottles, you can create images that are both captivating and informative. This article delves into the essential techniques and tools needed to master macro photography of perfume bottles, ensuring that every shot is as mesmerizing as the scent within.
Essential Equipment for Macro Photography
To capture the intricate details of perfume bottles effectively, having the right equipment is crucial. Here’s a breakdown of the essential tools and gear you’ll need for macro photography:
- Camera and Lenses: The foundation of macro photography is a high-quality camera paired with a dedicated macro lens. A macro lens allows you to focus on the smallest details with exceptional clarity. When selecting a lens, look for one with a 1:1 magnification ratio, which enables you to capture life-size images of your subject. While a digital single-lens reflex (DSLR) or mirrorless camera offers the best results, some high-end compact cameras also have excellent macro capabilities.
- Lighting: Proper lighting is vital to bring out the best in your macro shots. Natural light can be effective, but it often requires careful positioning and timing. For more controlled lighting, use artificial sources such as studio lights or LED panels. Incorporate diffusers to soften harsh light and reduce reflections, and use reflectors to bounce light onto the bottle from different angles, highlighting its details and colors.
- Tripod and Stabilization: Macro photography demands precise focus and stability. A sturdy tripod is essential to keep your camera steady and prevent camera shake, which can blur your images. For added stability, consider using a remote shutter release or your camera’s timer function to avoid any movement when taking the shot. If a tripod is not practical, ensure you have a stable surface and practice careful hand-holding techniques.
With these tools at your disposal, you’ll be well-equipped to start capturing the fine details of perfume bottles. The right equipment, combined with careful technique and creative vision, will enable you to create stunning macro photographs that truly highlight the artistry of these elegant containers.
Preparing the Perfect Shot
Preparing for a macro photo shoot involves careful planning and attention to detail. Here’s a comprehensive guide to ensure your perfume bottle shots turn out as stunning as you envision:
- Cleaning the Bottles: Before setting up your shot, thoroughly clean the perfume bottles to remove any dust, smudges, or fingerprints. Use a soft, lint-free cloth and a gentle glass cleaner to avoid scratching the surface. Any residue or dirt can detract from the clarity and overall quality of your macro photos. Additionally, clean any props or backgrounds to prevent unwanted spots or reflections in the final image.
- Setting Up the Scene: The backdrop and surrounding environment can significantly impact the final look of your photograph. Choose a background that complements and enhances the perfume bottle without overshadowing it. Neutral colors or simple patterns often work best, as they do not distract from the subject. Experiment with various backgrounds such as fabric, paper, or textured surfaces to find what works best for your specific bottle.
- Background and Props: Select backgrounds and props that highlight the bottle’s design and color. For example, a metallic or mirrored surface can enhance the bottle’s reflective qualities, while a soft fabric can add a touch of elegance. Ensure that props do not overpower the bottle or introduce unwanted distractions. Keep the scene clean and uncluttered to maintain the focus on the perfume bottle.
- Lighting Techniques: Proper lighting is essential for showcasing the intricate details of perfume bottles. The goal is to achieve a balance between highlighting the bottle’s features and avoiding harsh reflections or shadows.
- Diffusers: Use diffusers to soften and diffuse light, reducing harsh reflections and creating a more even illumination. You can use commercial diffusers or make your own using materials like white cloth or tracing paper.
- Reflectors: Position reflectors to bounce light onto the bottle from different angles, enhancing its details and colors. Reflectors can be purchased or improvised with materials like white foam board or aluminum foil.
- Light Positioning: Experiment with different light angles to find the most flattering position. Side lighting can emphasize textures and details, while backlighting can create a dramatic effect by highlighting the bottle’s shape and transparency.
Mastering Focus and Depth of Field
In macro photography, achieving precise focus and controlling depth of field are critical for capturing the fine details of your subject. Here’s how to master these techniques:
- Focusing Techniques: Macro photography requires exceptional focus accuracy, as even slight deviations can result in blurred images. Use your camera’s manual focus feature to achieve precise control over the focal point.
- Focus Stacking: For shots requiring greater depth of field, consider using focus stacking techniques. This involves taking multiple images at different focal points and combining them in post-processing to create a single image with extended depth of field. Focus stacking software can help automate this process and produce sharper results.
- Live View Mode: Utilizing your camera’s live view mode can help you achieve better focus accuracy by allowing you to see the image on the screen and make adjustments as needed.
- Depth of Field: Depth of field (DOF) refers to the range of distance within a photo that appears sharp and in focus. In macro photography, a shallow depth of field can create a pleasing background blur (bokeh) and emphasize the subject.
- Aperture Settings: Adjust the aperture (f-stop) to control the depth of field. A lower f-stop (e.g., f/2.8) results in a shallower depth of field, creating a more pronounced background blur and highlighting the main subject. Conversely, a higher f-stop (e.g., f/16) increases the depth of field, making more of the image appear in focus but potentially reducing overall sharpness due to diffraction.
- Maintaining Sharpness: Ensure that your focus is set precisely on the most important part of the bottle, whether it’s the label, the cap, or a decorative element. Avoid excessive aperture settings that may introduce diffraction and reduce image sharpness. Experiment with different settings to find the optimal balance between depth of field and overall image quality.
By meticulously preparing your setup and mastering focus and depth of field, you’ll be able to capture the intricate beauty of perfume bottles in macro photography. These techniques will allow you to create images that not only showcase the design and craftsmanship of the bottles but also convey their elegance and allure in stunning detail.
Capturing Reflections and Transparencies
Perfume bottles, often made of glass or other reflective materials, present unique challenges and opportunities for macro photography. Mastering how to capture reflections and transparencies can elevate your photos from ordinary to extraordinary.
- Handling Reflections: Reflections on glass surfaces can be both a blessing and a challenge. They can add an intriguing element to your photos, but they also have the potential to cause unwanted distractions or distortions.
- Minimizing Unwanted Reflections: To minimize unwanted reflections, carefully position your lights and camera. Avoid placing lights directly in front of or behind the bottle, as this can create harsh reflections. Instead, try placing lights at a 45-degree angle to the bottle. Use polarizing filters on your lens to reduce glare and control reflections more effectively. Adjust the angle of your camera and lights until you find a position that minimizes unwanted reflections while highlighting the bottle’s features.
- Enhancing Positive Reflections: Use positive reflections creatively to enhance the visual appeal of your images. For example, reflections on a polished surface can create a sophisticated and elegant effect. Experiment with different reflective surfaces, such as mirrors or metallic sheets, to find the most flattering backdrop for your bottle.
- Showcasing Transparency: Many perfume bottles feature transparent elements that can be accentuated with careful lighting and composition. Capturing transparency effectively requires an understanding of how light interacts with the glass.
- Backlighting: Use backlighting to highlight the transparency of the bottle and the color of the perfume. Position a light source behind the bottle to illuminate it from within, creating a glowing effect. Adjust the intensity and angle of the backlight to control the amount of illumination and enhance the clarity of the liquid inside the bottle.
- Lighting Through Glass: When photographing transparent bottles, experiment with different lighting techniques to showcase the clarity and color of the liquid. Position a light source to shine through the glass and illuminate the contents. This can help reveal the subtle hues and textures of the perfume while maintaining the transparency of the bottle.
- Managing Color and Hue: The color of the liquid inside the bottle can affect how it appears in photos. Use color correction tools during post-processing to adjust the hue and saturation of the liquid, ensuring it accurately represents the bottle’s intended appearance. Pay attention to how the color interacts with the surrounding lighting and reflections to achieve a cohesive and visually appealing result.
Post-Processing Tips
Post-processing is a crucial step in refining your macro photos and bringing out the best in your perfume bottle images. Effective editing can enhance clarity, adjust colors, and correct any issues that arose during the shoot.
- Editing Software: Utilize advanced editing software such as Adobe Lightroom or Photoshop to make precise adjustments to your images. These tools offer a range of features that can enhance details, correct exposure, and fine-tune colors.
- Adjusting Exposure and Contrast: Start by adjusting the exposure and contrast of your images to ensure they are well-balanced and visually appealing. Increase or decrease the exposure as needed to correct any overexposed or underexposed areas. Adjust the contrast to highlight the details and textures of the bottle, creating a more dynamic and engaging image.
- Enhancing Sharpness: Use sharpening tools to enhance the clarity and crispness of your macro shots. Apply selective sharpening to specific areas of the image, such as the label or decorative elements, to draw attention to key features. Be careful not to over-sharpen, as this can introduce noise and artifacts.
- Correcting Colors and White Balance: Adjust the color balance and white balance to ensure that the colors in your images accurately represent the bottle and its contents. Use color correction tools to correct any color casts and enhance the overall color accuracy. Pay attention to how the color of the liquid and the reflections interact with the lighting to achieve a natural and cohesive look.
- Retouching and Removing Flaws: Retouch your images to remove any imperfections, such as dust spots or minor blemishes. Use cloning or healing tools to fix any areas that require correction. Carefully review the image for any distracting elements and make adjustments as needed to ensure a clean and polished final result.
- Saving and Exporting: Save your edited images in high-resolution formats to maintain quality and detail. Export your photos in appropriate file formats for their intended use, whether for web display or print. Consider creating different versions of your images, such as web-optimized files or high-resolution prints, to suit various applications.
By carefully handling reflections and transparencies, and employing effective post-processing techniques, you can elevate your macro photography of perfume bottles to new heights. These steps will help you capture and present the intricate beauty of these elegant objects with precision and artistry.
Creative Approaches and Ideas
Exploring creative approaches in macro photography can elevate your perfume bottle images and bring a fresh perspective to your work. Here are some inventive ideas to experiment with:
- Unique Angles: Experiment with unconventional angles to add intrigue and uniqueness to your photos. Instead of shooting from eye level, try capturing the bottle from above, below, or even at a slight diagonal angle. This approach can reveal interesting patterns, reflections, and details that may not be visible from traditional perspectives. Consider the bottle’s design and shape when choosing your angle to highlight its most captivating features.
- Artistic Effects: Incorporate artistic effects to enhance the visual impact of your macro shots. Techniques such as bokeh, which creates a blurred background with attractive out-of-focus highlights, can add depth and interest to your images. Use aperture settings and lighting to achieve the desired bokeh effect. Additionally, consider applying filters or overlays in post-processing to create a unique artistic touch, such as adding a soft vignette or adjusting color tones to match a specific theme.
- Color and Texture Play: Experiment with color contrasts and texture play to create visually striking images. Use contrasting backgrounds or props to make the bottle’s colors pop. Additionally, explore textures such as fabric, paper, or metallic surfaces to add dimension and richness to your shots. Combining different textures and colors can create a dynamic composition that draws viewers’ attention.
- Macro Details Focus: Highlight specific details of the perfume bottle that may be overlooked in wider shots. Focus on intricate design elements such as engravings, embossments, or unique cap designs. Capture close-ups of the bottle’s label, logo, or decorative features to showcase the craftsmanship and artistry involved.
- Reflections and Shadows: Play with reflections and shadows to add drama and depth to your images. Utilize reflective surfaces or mirrors to create interesting reflections of the bottle. Experiment with shadow play by positioning the bottle and light sources to cast intriguing shadows that complement the overall composition.
Perfecting Your Macro Shots
Achieving perfection in macro photography of perfume bottles involves a blend of technical skill, creativity, and meticulous attention to detail. By understanding and applying the techniques outlined in this article, you can elevate your macro shots to capture the true essence and elegance of these beautiful objects. From selecting the right equipment and mastering focus to handling reflections and post-processing, each step plays a crucial role in creating stunning and visually engaging images.
Remember that macro photography is both an art and a science. Embrace experimentation and creativity, and don’t be afraid to explore new techniques and ideas. With practice and perseverance, you’ll be able to produce images that not only showcase the intricate beauty of perfume bottles but also reflect your unique artistic vision.
Questions and Answers
To minimize unwanted reflections, position your lights at an angle rather than directly in front or behind the bottle. Use polarizing filters on your lens to reduce glare and control reflections more effectively. Experiment with light angles and use diffusers to soften light, which can help manage reflections and create a more even illumination.
To showcase the transparency of a perfume bottle, use backlighting to illuminate the bottle from behind, creating a glowing effect. Position a light source to shine through the glass to highlight the color and clarity of the liquid inside. Adjust the intensity and angle of the backlight to achieve the desired transparency effect and enhance the visual appeal of the bottle.
To achieve a shallow depth of field, use a lower f-stop (e.g., f/2.8) on your camera. This will create a pronounced background blur and emphasize the main subject. Ensure that the focus is precisely set on the key details of the bottle. Be mindful of potential diffraction at very high f-stop settings, which can reduce overall sharpness, and find a balance that highlights the desired features while maintaining image quality.